diff options
| author | Malkierian <malkierian@gmail.com> | 2024-06-02 19:54:36 -0700 |
|---|---|---|
| committer | GitHub <noreply@github.com> | 2024-06-02 21:54:36 -0500 |
| commit | 5de6a9ac8f9d9b339ac51e7cfdd5789298f5aced (patch) | |
| tree | 81daf475e833c41a856a0e8e71396dbcf86de91b /docs | |
| parent | 03a597d44c5483eb3a6e033128935f08845cd188 (diff) | |
Add 2ship-specific BUILDING.md and supportedHashes.json. (#551)
* Add 2ship-specific BUILDING.md and supportedHashes.json.
* Somehow missed N64 hash.
Shipwright -> 2ship2harkinian
Ship.sln -> 2s2h.sln
* Mac dependencies
Co-authored-by: inspectredc <78732756+inspectredc@users.noreply.github.com>
---------
Co-authored-by: inspectredc <78732756+inspectredc@users.noreply.github.com>
Diffstat (limited to 'docs')
| -rw-r--r-- | docs/BUILDING.md | 229 | ||||
| -rw-r--r-- | docs/supportedHashes.json | 10 |
2 files changed, 239 insertions, 0 deletions
diff --git a/docs/BUILDING.md b/docs/BUILDING.md new file mode 100644 index 000000000..24cd73f45 --- /dev/null +++ b/docs/BUILDING.md @@ -0,0 +1,229 @@ +# Building 2 Ship 2 Harkinian + +## Windows + +Requires: + * At least 8GB of RAM (machines with 4GB have seen complier failures) + * Visual Studio 2022 Community Edition with the C++ feature set + * One of the Windows SDKs that comes with Visual Studio, for example the current Windows 10 version 10.0.19041.0 + * The `MSVC v142 - VS 2019 C++ build tools` component of Visual Studio + * Python 3 (can be installed manually or as part of Visual Studio) + * Git (can be installed manually or as part of Visual Studio) + * Cmake (can be installed via chocolatey or manually) + +During installation, check the "Desktop development with C++" feature set: + +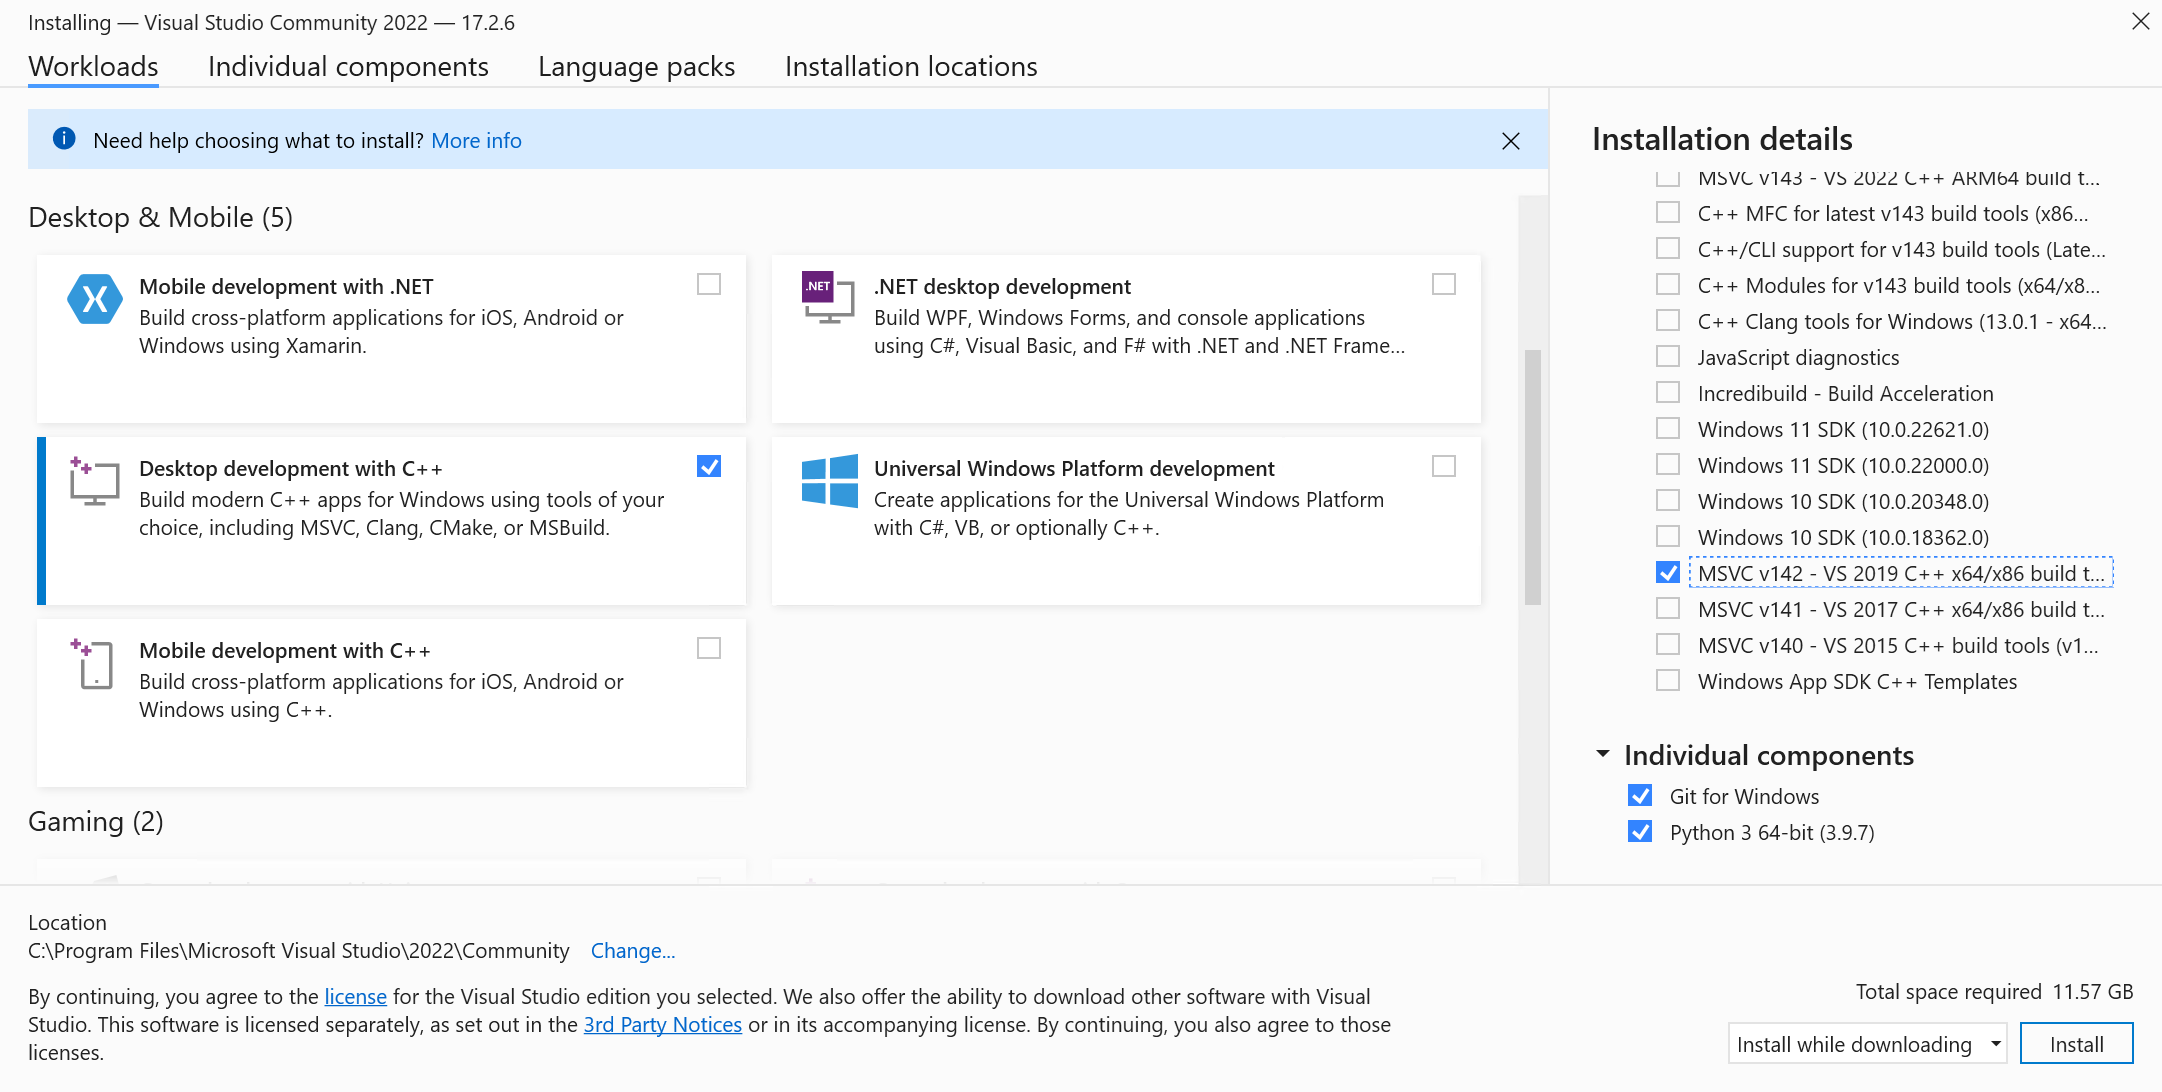 +Doing so should also check one of the Windows SDKs by default. Then, in the installation details in the right-hand column, make sure you also check the v142 toolset. + +You can also find the v142 toolset by searching through the individual components tab: + +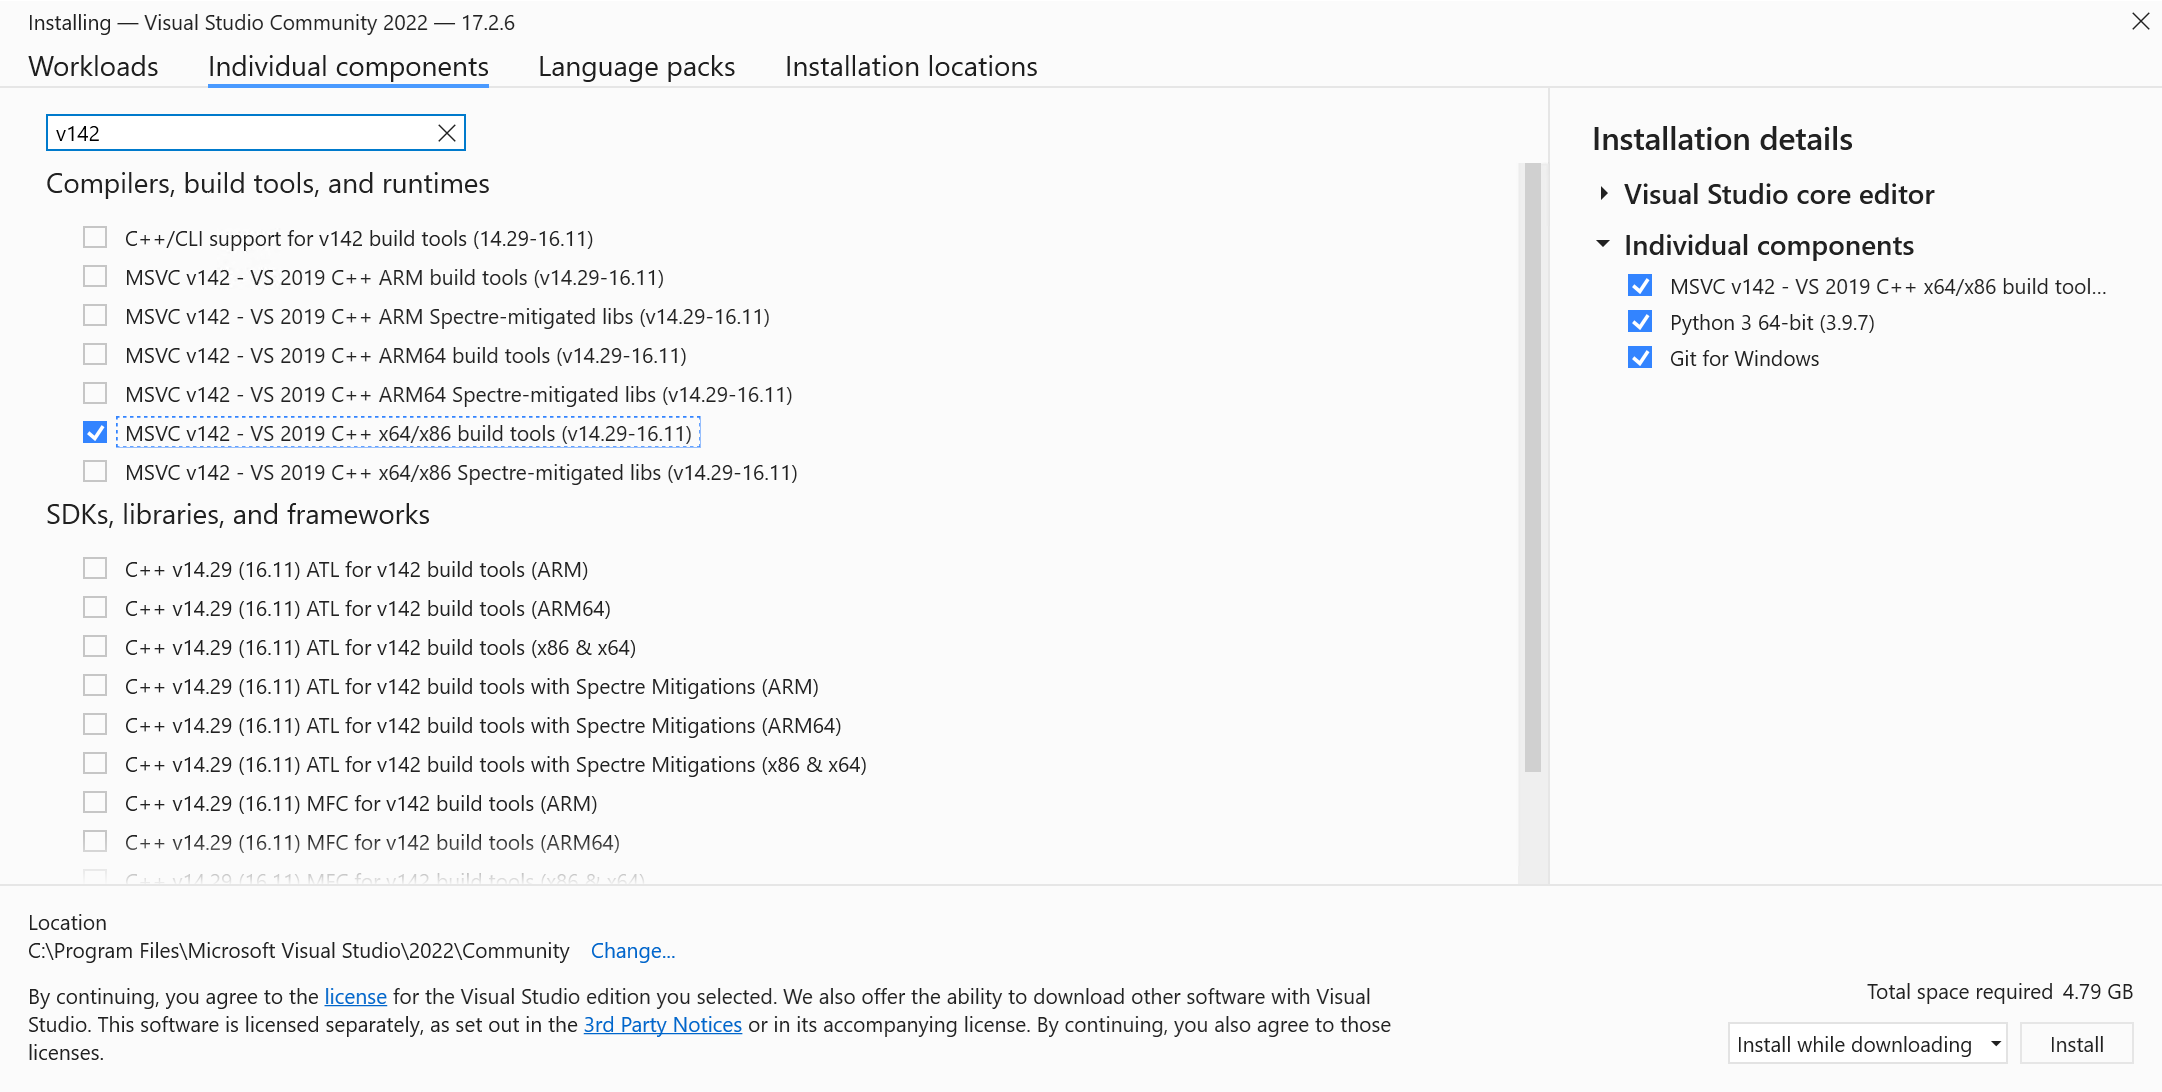 +While you're there, you can also install Python 3 and Git if needed. + +1. Clone the 2 Ship 2 Harkinian repository + +_Note: Be sure to either clone with the ``--recursive`` flag or do ``git submodule init`` after cloning to pull in the libultraship submodule!_ + +2. Place one or more [compatible](#compatible-roms) roms in the `OTRExporter` directory with namings of your choice + +_Note: Instructions assume using powershell_ +```powershell +# Navigate to the 2ship2harkinian repo within powershell. ie: cd "C:\yourpath\2ship2harkinian" +cd 2ship2harkinian + +# Setup cmake project +& 'C:\Program Files\CMake\bin\cmake' -S . -B "build/x64" -G "Visual Studio 17 2022" -T v142 -A x64 # -DCMAKE_BUILD_TYPE:STRING=Release (if you're packaging) +# or for VS2019 +& 'C:\Program Files\CMake\bin\cmake' -S . -B "build/x64" -G "Visual Studio 16 2019" -T v142 -A x64 +# Extract assets & generate OTR (run this anytime you need to regenerate OTR) +& 'C:\Program Files\CMake\bin\cmake.exe' --build .\build\x64 --target ExtractAssets # --config Release (if you're packaging) +# Compile project +& 'C:\Program Files\CMake\bin\cmake.exe' --build .\build\x64 # --config Release (if you're packaging) + +# Now you can run the executable in .\build\x64 + +# If you need to clean the project you can run +& 'C:\Program Files\CMake\bin\cmake.exe' --build .\build\x64 --target clean + +# If you need to regenerate the asset headers to check them into source +& 'C:\Program Files\CMake\bin\cmake.exe' --build .\build\x64 --target ExtractAssetHeaders + +# If you need a newer 2ship.o2r only +& 'C:\Program Files\CMake\bin\cmake.exe' --build .\build\x64 --target Generate2ShipOtr +``` + +### Developing 2S2H +With the cmake build system you have two options for working on the project: + +#### Visual Studio +To develop using Visual Studio you only need to use cmake to generate the solution file: +```powershell +# Generates 2s2h.sln at `build/x64` for Visual Studio 2022 +& 'C:\Program Files\CMake\bin\cmake' -S . -B "build/x64" -G "Visual Studio 17 2022" -T v142 -A x64 +# or for Visual Studio 2019 +& 'C:\Program Files\CMake\bin\cmake' -S . -B "build/x64" -G "Visual Studio 16 2019" -T v142 -A x64 +``` + +#### Visual Studio Code or another editor +To develop using Visual Studio Code or another editor you only need to open the repository in it. +To build you'll need to follow the instructions from the building section. + +_Note: If you're using Visual Studio Code, the [cpack plugin](https://marketplace.visualstudio.com/items?itemName=ms-vscode.cmake-tools) makes it very easy to just press run and debug._ + +_Experimental: You can also use another build system entirely rather than MSVC like [Ninja](https://ninja-build.org/) for possibly better performance._ + + +### Generating the distributable +After compiling the project you can generate the distributable by running: +```powershell +# Go to build folder +cd "build/x64" +# Generate +& 'C:\Program Files\CMake\bin\cpack.exe' -G ZIP +``` + +## Linux +### Install dependencies +#### Debian/Ubuntu +```sh +# using gcc +apt-get install gcc g++ git cmake ninja-build lsb-release libsdl2-dev libpng-dev libsdl2-net-dev libzip-dev zipcmp zipmerge ziptool nlohmann-json3-dev libtinyxml2-dev libspdlog-dev libboost-dev libopengl-dev + +# or using clang +apt-get install clang git cmake ninja-build lsb-release libsdl2-dev libpng-dev libsdl2-net-dev libzip-dev zipcmp zipmerge ziptool nlohmann-json3-dev libtinyxml2-dev libspdlog-dev libboost-dev libopengl-dev +``` +#### Arch +```sh +# using gcc +pacman -S gcc git cmake ninja lsb-release sdl2 libpng libzip nlohmann-json tinyxml2 spdlog sdl2_net boost + +# or using clang +pacman -S clang git cmake ninja lsb-release sdl2 libpng libzip nlohmann-json tinyxml2 spdlog sdl2_net boost +``` +#### Fedora +```sh +# using gcc +dnf install gcc gcc-c++ git cmake ninja-build lsb_release SDL2-devel libpng-devel libzip-devel libzip-tools nlohmann-json-devel tinyxml2-devel spdlog-devel boost-devel + +# or using clang +dnf install clang git cmake ninja-build lsb_release SDL2-devel libpng-devel libzip-devel libzip-tools nlohmann-json-devel tinyxml2-devel spdlog-devel boost-devel +``` +#### openSUSE +```sh +# using gcc +zypper in gcc gcc-c++ git cmake ninja SDL2-devel libpng16-devel libzip-devel libzip-tools nlohmann_json-devel tinyxml2-devel spdlog-devel + +# or using clang +zypper in clang libstdc++-devel git cmake ninja SDL2-devel libpng16-devel libzip-devel libzip-tools nlohmann_json-devel tinyxml2-devel spdlog-devel +``` + +### Build + +_Note: If you're using Visual Studio Code, the [CMake Tools plugin](https://marketplace.visualstudio.com/items?itemName=ms-vscode.cmake-tools) makes it very easy to just press run and debug._ + +```bash +# Clone the repo and enter the directory +git clone https://github.com/HarbourMasters/2ship2harkinian.git +cd 2ship2harkinian + +# Clone the submodules +git submodule update --init + +# Generate Ninja project +cmake -H. -Bbuild-cmake -GNinja # -DCMAKE_BUILD_TYPE:STRING=Release (if you're packaging) -DPython3_EXECUTABLE=$(which python3) (if you are using non-standard Python installations such as PyEnv) + +# Generate 2ship.o2r +cmake --build build-cmake --target Generate2ShipOtr + +# Compile the project +cmake --build build-cmake # --config Release (if you're packaging) + +# Now you can run the executable in ./build-cmake/mm/2s2h.elf +# To develop the project open the repository in VSCode (or your preferred editor) +``` + +### Generate a distributable +After compiling the project you can generate a distributable by running of the following: +```bash +# Go to build folder +cd build-cmake +# Generate +cpack -G DEB +cpack -G ZIP +cpack -G External (creates appimage) +``` + +### Additional CMake Targets +#### Clean +```bash +# If you need to clean the project you can run +cmake --build build-cmake --target clean +``` + +#### Regenerate Asset Headers +```bash +# If you need to regenerate the asset headers to check them into source +cp <path to your ROM> OTRExporter +cmake --build build-cmake --target ExtractAssetHeaders +``` + +## macOS +Requires Xcode (or xcode-tools) && `sdl2, libpng, glew, ninja, cmake, nlohmann-json, libzip` (can be installed via homebrew, macports, etc) + +**Important: For maximum performance make sure you have ninja build tools installed!** + +_Note: If you're using Visual Studio Code, the [cpack plugin](https://marketplace.visualstudio.com/items?itemName=ms-vscode.cmake-tools) makes it very easy to just press run and debug._ + +```bash +# Clone the repo +git clone https://github.com/HarbourMasters/2ship2harkinian.git +cd 2ship2harkinian +# Clone the submodule libultraship +git submodule update --init +# Copy the baserom to the OTRExporter folder +cp <path to your ROM> OTRExporter +# Generate Ninja project +cmake -H. -Bbuild-cmake -GNinja # -DCMAKE_BUILD_TYPE:STRING=Release (if you're packaging) +# Extract assets & generate OTR (run this anytime you need to regenerate OTR) +cmake --build build-cmake --target ExtractAssets +# Compile the project +cmake --build build-cmake # --config Release (if you're packaging) + +# Now you can run the executable file: +./build-cmake/mm/2s2h-macos +# To develop the project open the repository in VSCode (or your preferred editor) + +# If you need to clean the project you can run +cmake --build build-cmake --target clean + +# If you need to regenerate the asset headers to check them into source +cmake --build build-cmake --target ExtractAssetHeaders + +# If you need a newer 2ship.o2r only +cmake --build build-cmake --target Generate2ShipOtr +``` + +### Generating a distributable +After compiling the project you can generate a distributable by running of the following: +```bash +# Go to build folder +cd build-cmake +# Generate +cpack +``` + +# Compatible Roms +See [`supportedHashes.json`](supportedHashes.json) + +## Getting CI to work on your fork + +The CI works via [Github Actions](https://github.com/features/actions) where we mostly make use of machines hosted by Github; except for the very first step of the CI process called "Extract assets". This steps extracts assets from the game file and generates an "assets" folder in `mm/`. + +To get this step working on your fork, you'll need to add a machine to your own repository as a self-hosted runner via "Settings > Actions > Runners" in your repository settings. Make sure to add the 'asset-builder' tag to your newly added runner to assign it to run this step. To setup your runner as a service read the docs [here](https://docs.github.com/en/actions/hosting-your-own-runners/configuring-the-self-hosted-runner-application-as-a-service?platform=linux). + +### Runner on Windows +You'll have to enable the ability to run unsigned scripts through PowerShell. To do this, open Powershell as administrator and run `set-executionpolicy remotesigned`. Most dependencies get installed as part of the CI process. You will also need to separately install 7z and add it to the PATH so `7z` can be run as a command. [Chocolatey](https://chocolatey.org/) or other package managers can be used to install it easily. + +### Runner on UNIX systems +If you're on macOS or Linux take a look at `macports-deps.txt` or `apt-deps.txt` to see the dependencies expected to be on your machine. diff --git a/docs/supportedHashes.json b/docs/supportedHashes.json new file mode 100644 index 000000000..f85ec84c3 --- /dev/null +++ b/docs/supportedHashes.json @@ -0,0 +1,10 @@ +[ + { + "name": "N64 US", + "sha1": "d6133ace5afaa0882cf214cf88daba39e266c078" + }, + { + "name": "GC US", + "sha1": "9743aa026e9269b339eb0e3044cd5830a440c1fd" + } +]
\ No newline at end of file |